domingo, 30 de diciembre de 2012

Last holiday designs / Ultimos diseños decembrinos

 Hi everyone! So, i've been a little absent, im sorry. I was just chatchin' up with my tv series! American Horror Story, Glee, The Walking dead... Anyways, this post is to show you the last two manis I did for December. First one is a 3D thing, I tried to make a tree or something, i put a star and some studs.

Hola! He estado un poco ausente, lo siento! Es que me estaba poniendo al corriente con mis series, American Horror Story, Glee, The walking dead... Bueno, este post es para enseñarles los ultimos dos diseños que hice para esta temporada decembrina. Primero tenemos una cosa 3D, intente hacer un arbol o algo asi, puse una estrella y algunos estoperoles.


Now for the second one, since it was extremely hard to capture, i only took two macro shots. It was a stunning, super shiny mani that I loved and i wore on Christmas eve. Base color was OPI Goldeneye, then a saran wrap with CG's Running in circles and on top of it OPI The living daylights. Kinda like a xmas tree. I got a lot of compliments on these.

Ahora la segunda, como fue muy dificil de capturar, solo tome dos macros. Fue un diseño increible, muy brilloso, que me encantó y use en Navidad. El color base fue Goldeneye de OPI, luego Running in circles de China Glaze y arriba, The living daylights de OPI. Como un arbol de Navidad. 


Thanks for reading!/Gracias por leer!

martes, 25 de diciembre de 2012

Fav base & top coat

 Supah quick blog post. Just wanted to show you my personal faves. It is important to always use base and top coat -among other nail treatments-. Here are the ones that work the best for me:
-Base coat: OPI Nail Envy. Best of the best. Works like a charm. You really see the results of using it. I usually do two coats before the color coat.
-Top coat: China Glaze Fast forward top coat. This was the first top coat i used and after trying several others, i came back to it. Its the shiniest, dries soooo fast. It does have a funny smell but thats not really important.
-Matte top coat: Essie matte about you. This one is actually here because I do not own another one. But it really works and the result is so matte. It was a little bit expensive though, so If you find a cheaper one that works as great as this one, stick to it. 
If you have any questions please ask Ill answer every single one. 
Ill leave you with an akward mani I did last week. A dear friend of mine called it 'Tiger Stripes' lol. Enjoy!

Post rapido. Solo quería enseñarles mis favoritos. Es importante siempre usar base y top coat -entre otros tratamientos-. Aqui, los que a mi me funcionan mejor:
-Base: OPI Nail Envy. Lo mejor de lo mejor. Funciona como magia. De verdad se aprecian los resultados de usarlo. Suelo poner dos capas antes del color.
-Top coat: China Glaze Fast forward top coat. Esta fue la primera top coat que use y despues de probar muchos otros, volví a esta. Es la que queda mas brillosa, seca rapidismo! Tiene un olor curioso pero eso realmente no importa.
-Matte top coat: Essie matte about you. Esta de hecho la puse aqui porque no tengo de otra marca. Pero de verdad funciona y el resultado es realmente matte. Si fue un poco costosa asi que si encuentras una mas económica que funcione tan bien como esta, quedate con esa. 
Si tienes alguna pregunta, solo comentala y contestaré todas. 
Te dejo con un diseño medio raro que hice la semana pasada. Una amiga lo llamo 'Tiger stripes' ja. Disfruta!


*Nail Envy de venta en Beauty Corner

sábado, 22 de diciembre de 2012

Falling snow NOTD

 I like Christmas. It might be my fave time of the year. And since ive been doing nail art since April I didnt get the chance to do christmas manis before. So heres one. It's falling snow, or thats what I wanted it to be lol. I did a gradient only on the tips with CG's White on white over For Audrey, and then I did a glitter gradient as the snowflakes. I hope you like it! Much love.

Me gusta la Navidad. Creo que es mi época favorita del año. Y como empecé con el nail art en Abril, no tuve oportunidad de hacer manis navideños hasta ahora. Asi que aqui hay uno. Es nieve cayendo, o eso es lo que queria que fuera jajaja. Hice un gradiente con White on White en las puntas sobre For Audrey, los dos de China Glaze, y luego un gradiente de glitter como los copos. Espero que te guste. Besos!


PS. I actually never seen snow.
PD. De hecho nunca he visto la nieve.

martes, 18 de diciembre de 2012

OPI: The man with the golden gun

 Ever since I knew I was gonna be able to get The man with the golden gun, I created a design in my mind for it. That was the first days of October, and now I was able to place that exact design on my nails. But let me tell you, if you didnt hear about TMWTGG, i'll tell you what its all about. TMWTGG is part of de OPI collection, Skyfall. Its a way to celebrate 50 years of 007. It comes in a special box, in a golden bottle. Its a top coat, a clear base with tiny real 18k gold leaf. Take a look at the pics so you see how special it is!

Desde que supe que iba a tener The man with the golden gun, imaginé un diseño en mi mente. Eso fue los primeros dias de Octubre, y ahora pude hacer ese mismo diseño en mis uñas. Pero dejame te digo, si no escuchaste de TMWTGG, te diré de que se trata.
TMWTGG es parte de la colección Skyfall de OPI. Es una forma de celebrar 50 años del 007. Viene en una capa especial, en una botella dorada. Es una top coat, una base transparente con pequeños pedazos de oro de 18 kilates. Mira las fotos, para que veas cuan especial es.


Now i'll just share some pics of my mani. Let me say, i loved the outcome! exactly as I planned. Base colors are Spontaneous and Blue Iguana, both from China Glaze. Thank you for reading, and enjoy!

Ahora comparto unas fotos de mi diseño. Amé como salió, exactamente como yo lo planee! Los colores de base son Spontaneous y Blue Iguana, ambos de China Glaze. Gracias por leer, y disfruta!


Que donde lo consegui? Pues en Beauty Corner, claro. Info del lado derecho del blog.

lunes, 17 de diciembre de 2012

China Glaze Cirque du soleil: Worlds away 2012

Urrgh! Sally Beauty Supply I hate you! They had only a few bottles of each shade and they dont restock. Please tell me how is that freakin' possible! Anyways, I was able to grab at least three babies (I lost Its a trap-eze though ;_;) and here I have some pics for your delight.

Ughh!!! Sally Beauty Supply, te odio! Solo tenian algunas botellas de cada color y no resurten. Por favor que alguien me diga como eso es posible! Pero bueno, pude traer a casa 3 bebés (aunque me perdí de It's a trap-eze ;_;) y aqui traigo algunas fotos para deleitarse.


 Running in circles is a intense, 'plant' green jelly base fully packed with green micro glitter. Amazing! I love it so much! 

Running in circles es una base jelly verde intenso, (verde planta diria yo) cargadísima de micro glitter verde. Increible! Lo amo!


Water you waiting for. Its gorgeous. A blue jelly base, blue micro glitter, green small glitter, purple small glitter. It made me drool. 

Water you waiting for. Una base jelly azul, micro glitter azul, glitter pequeño morado y verde. Me hizo babear.


Last but not least, Whirled away. This reminds me of some indie brands. Let me say that even with the fact that application its not easy, cause you have to fish the white hex, this is so special and its on my list of all-time fave polishes. Slightly tinted base (I assume its glitter bleeding), white large hex, medium black hex, black bars. Gorgeous. Gorgeous. 

Último pero no menos importante, Whirled away. Me recuerda a algunas marcas indie. Aun cuando la aplicación no es sencilla pues hay que pezcar los glitters blancos, este esmalte es muy especial y ya está en mi lista de favoritos. Base ligeramente tintada (supongo que es un poco del glitter que pinto la base), hexagonos grandes blancos, negros medianos, y barras negras. Precioso. Precioso.

Shown over / Mostrado sobre: CG White on withe, Dior 219, CG Sea spray, CG Liquid leather, CG pink voltage, CG Happy Go Lucky, OPI Fly, CG Spontaneous.


Thank you for reading! / Gracias por leer!

OPI Skyfall Nail Apps

 Hi everyone! Days ago I got this awesome OPI nail apps, so I thought I share a little tutorial on how to put them on and some random thoughts.
OPI Pure Lacquer Nail Apps are pre-cut strips made 100% of nail polish. This envelope contains 16 stripes in different sizes to fit most nail sizes. There are 4 designs but here im showing 'Nice Tux HDL32'. Its a silver scattered holo glitter base with random black glitter zigzags. I loved this design cause its so sparkly! These nail apps are about 12.5 dollars.  
These strips have base coat- color coat- top coat meaning you dont need base nor top coat. 
BTW if you are too lazy to look every single pic juts go to the end of the post where I did a condensed tutorial :D

Hola! Hace unos dias fui a mi tienda preferida Beauty corner, y traje a casa estas increibles Nail Apps de OPI, asi que hice un pequeño tutorial sobre como ponerlas.
OPI Pure lacquer Nail Apps son tiras precortadas hechas 100% de esmalte de uñas. Este empaque contiene 16 tiras en diferentes tamaños para quedar bien en casi todos los tipos de uñas. Hay 4 diseños pero aqui les enseño 'Nice Tux HDL32'. Es una base de glitter plateado holografico con zigzags de glitter negro. Me encantó este diseño porque brilla muchisimo! Estas Nail apps cuestan 165 pesos en Beauty Corner.
Las tiras vienen asi: Base + Color/Diseño + Top coat. Osea que no necesitas ponerte nada ni antes, ni después.
Por cierto! Si te da flojera ver todas las fotos, puedes ir al final del post, donde puse un condensado del tutorial :D


 First of all, you have to find the right size for each nail. Do as shown in the pic. But choose wisely cause it might be too short for your nail.Its not a big deal if its too big though.

Primero, encuentra la tira adecuada para tu uña, asi como en la foto. Pero escoje bien pues si no te puede quedar muy chica. No hay tanto problema si te queda un poco grande.


Remove the top clear film, using the blue tab. Next, peel strip. From now on, try to be fast. As the strips are made 100% polish, they dry in no time and they its harder to stick them on the nail.

Quita el protector transparente con ayuda de la pestaña azul. Después, quita la tira de esmalte. A partir de ahorita, intenta ser un poco rápida. Como las tiras están hechas 100% de esmalte, se secan rapidamente y es mas difícil pegarlas en las uñas.


Stick the strip on your nail. Press firmely and smooth the surface.

Pon la tira en tu uña. Presiona firmemente y suaviza la superficie.


 Last step: file the excess downwards and smooth the edges. You're done!

Último paso: lima el exceso hacia abajo y empareja los bordes. Ya acabaste!


Final result/Resultado final:


 Best thing: Guess how much time it took me to put these babies on? No more than 5 minutes (I have a witness lol). I was able to have em on for 2 days, I only took them off cause I hardly can stand 2 days without painting my nails! I wore them for a dinner so they were perfect and I got a lot of compliments. 
Another perk: You don't have to wait til your nails are dry. This is awesome for people who dont have much patience. I loved that they look real and not fake as those cheap ugly stamps at the mall, urgh hate them.  Aaaaaand as a last comment these are actually cheaper than Sally Hansen's! (at least here in Mexico). I also made some pics on the taking-off part:

Lo mejor: Adivina cuanto tiempo me tomó ponerlas en las 10 uñas? No más de 5 minutos (y tengo un testigo jaja). Las pude tener 2 dias, solo me las quité porque con trabajos resisto 2 dias sin pintarme las uñas! Las usé para una cena asi que estuvieron perfectas y recibí muchos halagos!
Otra ventaja: no tienes que esperar a que tus uñas sequen. Esto esta excelente para gente que no tiene mucha paciencia. Me encantó que se ven muy reales y no falsas como esas estampas chafas que venden en el centro comercial ugggh las odio. Yyyyyyy como último comentario estas son mas baratas incluso que las de Sally Hansen! (al menos aqui en México, DF). También tome algunas fotos de cuando las quité:


Yep thats a cotton ball. As I said before these are 100% polish so I took them off with pure acetone. First the black came off, then the silver glitter. just as taking a real handmade design off. 

Si, se quitan con algodón y acetona! Como dije antes son 100% esmalte asi que las quite con acetona pura. Primero se cayó el negro y luego el glitter plateado, exactamente igual a quitar un diseño hecho a mano. 

Now, the condensed tutorial. 
Ahora, el tutorial condensado.


1. Choose the right size for your nail. 2. Take the clear film off. 3. Peel strip. 4. Apply on the nail. 5. Press on the sides. 6. Smooth the surface. 7. File off excess downwards. 8. Smooth the edges. Done!

1. Escoge el tamaño adecuado para tu uña. 2. Retira el protector transparente. 3. Despega la tira de esmalte del papel. 4. Pega en tu uña limpia. 5. Presiona los lados. 6. Empareja la superficie. 7. Lima el exceso hacia abajo. 8. Empareja los bordes. Listo!


Its a long, long post, im sorry! But I hope it helps in case you want to try them out. Thanks for reading!

Es un post largo, perdón! Pero espero que te sea útil en caso de que quieras probarlas. Gracias por leer!
*DE VENTA EN BEAUTY CORNER

sábado, 8 de diciembre de 2012

Watermarble: tips & tricks

Hi everyone! Today i'll tell you about my personal experience with watermarble so lets get started!
Hola! Hoy les contaré mi experiencia personal con el watermarble asi que empecemos!

So.. Watermarble. If you dont know whats a watermarble, I suggest you watch this video from my friend The Crafty Ninja on youtube. 
The watermarble technique is horrible! For so long I hated it (and I still do sometimes). Some of the issues I had were:
-Its a super mess / clean up its too hard
-My polish won't spread nicely
-When I try to make my design it gets ruined
-First polish spread nicely but second drop just doesnt
-My cuticles get too stained
Among other issues. It is really a hard technique to master. I've been doing nail art for several months now and the first thing I tried to do back then was watermarble. Theres no need to say I failed horribly. And it was only two weeks ago that I did a watermarble that I could call 'acceptable'. But let's take a look at the pics:

Watermarble : /. Si no sabes que es watermarble te sugiero que veas este video de mi amiga The Crafty Ninja en youtube.
La técnica del watermarble es horrible! Por mucho tiempo la odié (y a veces aun la odio). Algunos problemas que tuve fueron:
-Es un lío enorme / limpiar es muy difícil
-Mi esmalte no se expande bien
-Cuando intento hacer un diseño se arruina
-El primer esmalte se expande bien pero el segundo simplemente no
-Mis cutículas se manchan
Entre muchos otros problemas. Es realmente una técnica difícil de dominar. He estado haciendo nail art desde hace varios meses y lo primero que intente en esa entonces fue el watermarble. No hace falta de decir que fallé horriblemente. Y fue hace solo 2 semanas que hice un watermarble que pude llamar 'aceptable'. Pero veamos las fotos:


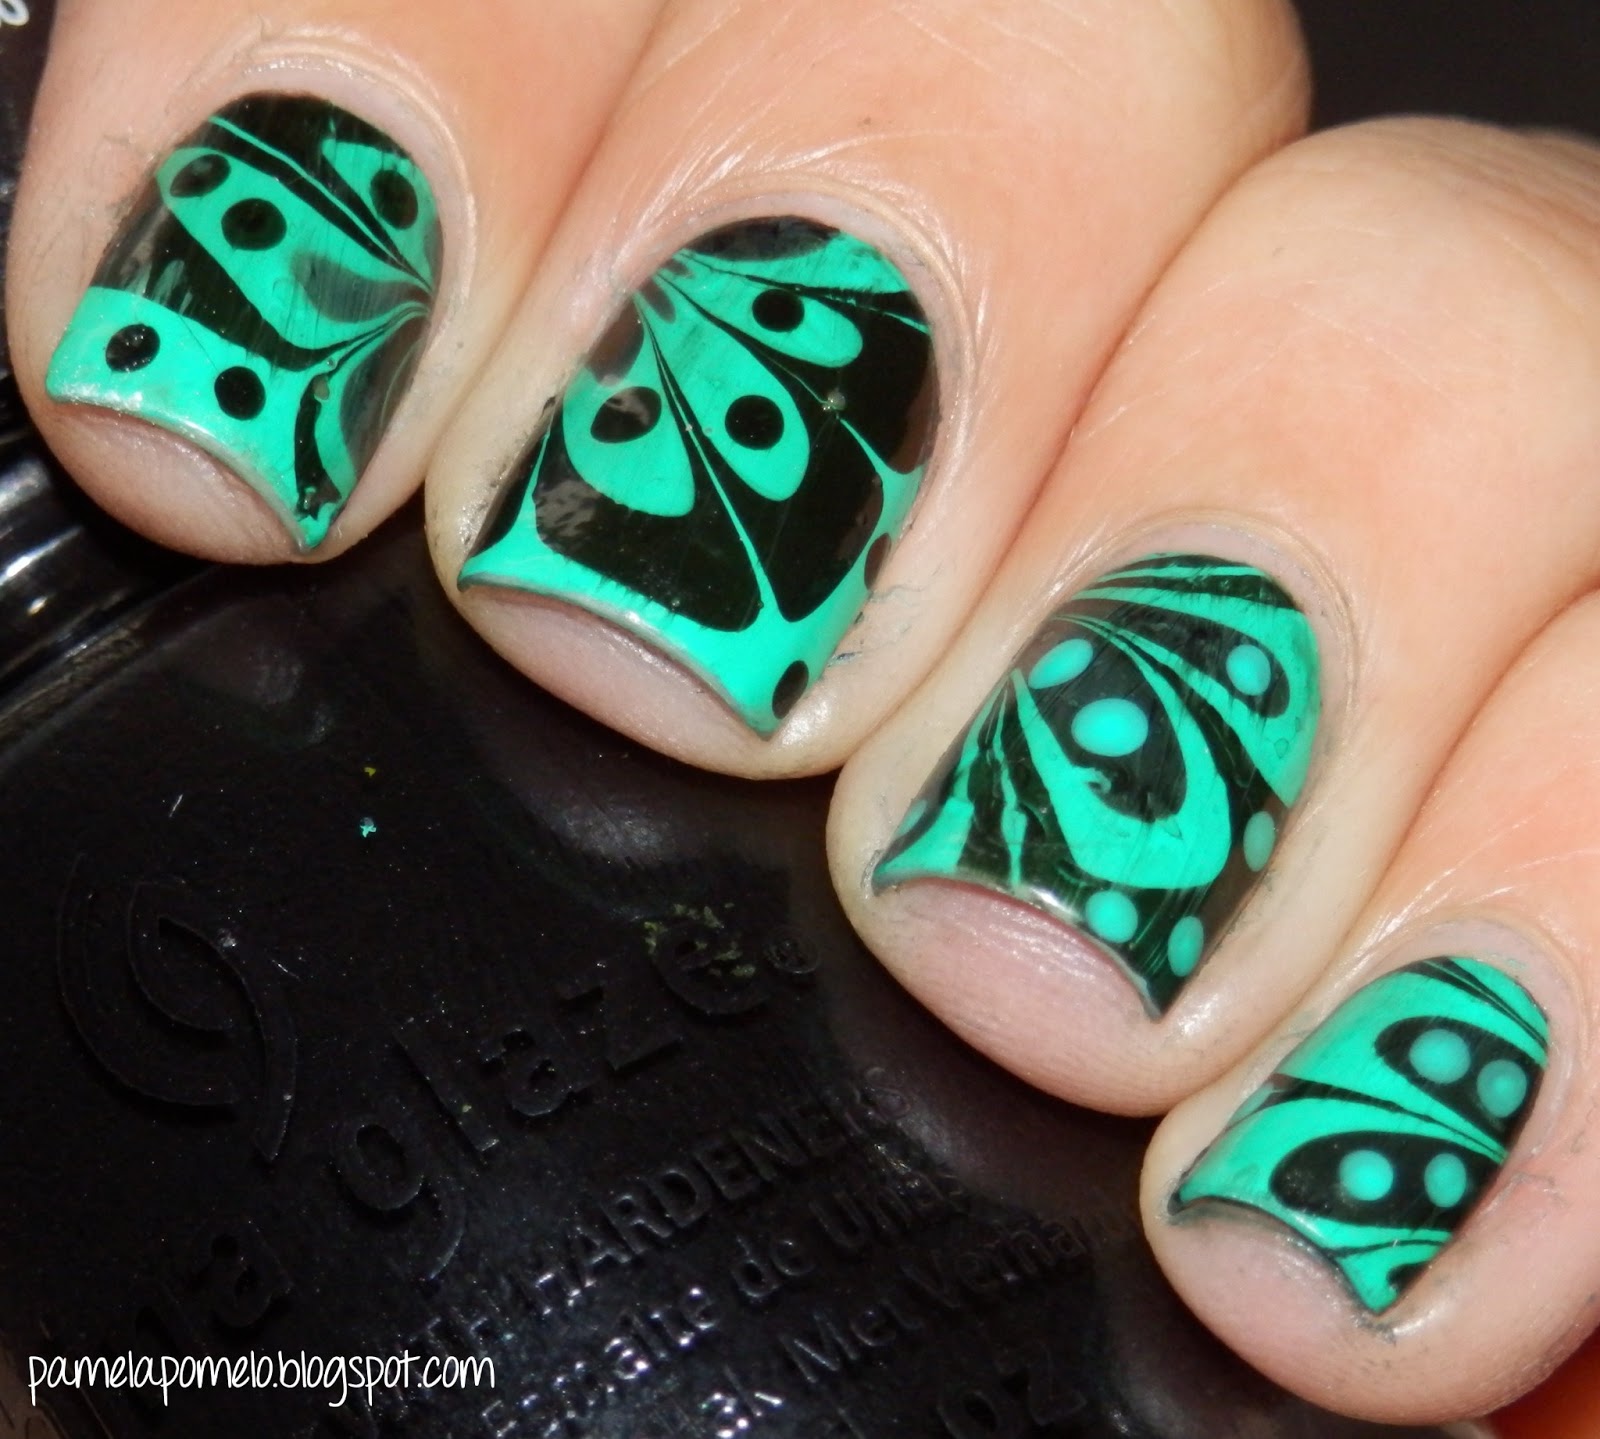
As you can see I had some problems. First of all my cuticles are super dirty, clean up was hard as hell. There's a lot of nail polish in my skin as you can see on my middle finger, but also I took of a lot of polish from my ring finger. The other ones are acceptable but not perfect. 
Theres a lot of dragging of the colors and they are mixed at some spots. Also I wasn't able to do a proper design and it looks too random. 

Como puedes ver tuve algunos problemas. Primero que nada mis cuticulas estan super sucias, limpiarlas fue muy dificil. Hay mucho esmalte en mi piel en mi dedo medio, pero tambien tomé demasiado esmalte cuando limpié mi dedo anular. Los otros estan aceptables, pero no perfectos.
Arrastré mucho los colores y estan mezclados en algunos puntos. Tampoco pude hacer un diseño tal cual y se ve muy random.

Now let's take a look at my second acceptable attempt.

Ahora veamos my segundo intento aceptable.


 I improved the clean up withouth taking a lot of polish off. Buuut.. There's a lot of dragging, i mean seriously can you see those horrible lines? disgusting! I got better when making the design though. Then I added a few dots with a dotting tool just because.

Mejoré en la limpieza sin quitar demasiado esmalte. Peeeero.. arrastré mucho los colores, puedes ver esas horribles lineas! Horrible! Sí mejore un poco en cuanto al diseño. Añadí algunos puntos con un puntero solo porque sí.

Here comes my third and most succesful attempt.
Ahora mi tercer y mas exitoso intento.


What do you think? I think clean up is perfect. Absolutely no dragging, nor mixing.  The design is exactly what I wanted, something simple, just some lines. It had a top coat before but I thought it would look awesome matte and so I did with Essie- matte about you.

Que te parece? Creo que la limpieza es perfecta. No hay arrastre de los colores, ni mezclado. El diseño es exactamente lo que queria, algo simple, solo algunas lineas. Tenia una top coat antes pero pensé que se vería genial mate y asi lo hice con Essie -  matte about you.

Now I do have some advice for you if you want to try watermarble:
-If its your first time with this technique, be patient. It's not going to come out nicely at first try. This is something you must try over and over again.
-Make some nail polish proofs. Did you noticed I used the same green on 2nd and 3rd attempts? Its China Glaze - Four leaf clover. When I poured it to the water it spread amazingly well. Thats what you should look for. Which ones of your stash can be used in watermarble. Cause some of them just stay in the drop and thats it, and thats not going to work at all.
-Be quick. If you take a lot of time between dropping one color and the other one, the polish will dry and when you try to make your design, it will break. Or when you pour the other color, it wont spread.
-Use a small container. When you do watermarble its convenient to do one nail at the time. If you use a big container you will waste a lot of nail polish. Also the design might get too big and wont fit your nail bead.
-Don't use polishes that are too pigmented. That's because it will make harder to clean your skin. Not impossible, just harder.
-Let the design dry before you apply a top coat to avoid dragging. 
-The most important thing is not to be dissapointed. Everyone can make a watermarble. It took me several months to achieve what you saw on the pics and I still need to master it. Remember practice makes perfect.

Ahora tengo algunos consejos si quieres intentar watermarble:
-Si es tu primera vez con esta técnica, se paciente. No va a salir perfecto en el primer intento. Esto es algo que tendrás que intentar una, y otra, y otra vez. 
-Haz algunas pruebas de esmalte. Notaste que use el mismo verde para el primer y segundo intentos? El color es Four Leaf Clover de China Glaze. Cuando lo puse en el agua se abrio increíblemente bien. Eso es lo que estas buscando. Cuales esmaltes tienes que se puedan usar, porque algunos de ellos simplemente se quedaran como una gota y ya, y eso no va a funcionar para nada. 
-Trabaja con rapidez. Si tomas mucho tiempo entre poner un esmalte y otro, el esmalte se secará y cuando intentes hacer el diseño, la superficie se romperá, o cuando pongas el otro color, este no se extenderá. 
-Usa un contenedor pequeño. Cuando haces watermarbles es conveniente hacer una uña a la vez. Si usas un contenedor grande, se desperdiciará demasiado esmalte. También puede suceder que el diseño quede demasiado grande y no cabrá en tu uña.
-No uses esmaltes que esten muy pigmentados. Eso es porque hará mas difícil limpiar tu piel. No imposible, solo mas difícil.
-Deja que el diseño se seque antes de poner la top coat para evitar el arrastre de esmalte.
-Lo mas importante es no decepcionarse. Cualquiera puede hacer un watermarble. A mi me tomo varios meses hacer lo que viste en las fotos y todavía necesito perfeccionarlo. Recuerda que la práctica hace al maestro. 

So thats my experience/advice and I hope you find it useful. Thank you for reading!

Bueno, esa fue mi experiencia/ consejo y espero que la encuentres útil. Gracias por leer!

Pamela.

sábado, 1 de diciembre de 2012

Christmas design / Diseño navideño

So, I know I just wrote a blog post, but whatever. I had to show you guys this design I did a few days ago. I uploaded it on Instagram only cause making entries for the blog sometimes its too time consuming and IG is fast, easy. This mani is very simple, I thought of a cozy christmas sweater, and then did a pattern on my nails with that on mind. For all the details I used a tiny brush that I found at a crafting store. When I took this pics I didnt had a top coat on, I thought (and I wasn't wrong) that when applying the top coat there would be some dragging (and that's exactly what happened) so enjoy this pics and share your thoughts with me!

Ya sé que acabo de escribir un blog post, pero no importa. Tenía que enseñarles este diseño que hice hace algunos dias. Lo subí solo en Instagram porque algunas veces escribir las entradas consume mucho tiempo, mientras que IG es rápido y fácil. Este diseño es muy sencillo, pensé en un sueter navideño y después hice un patrón en mis uñas con eso en mente. Para todos los detalles use un pincel muy delgado que encontré en una tienda de crafting. Cuando tome las fotos no tenia top coat encima porque pensé (y con sobrada razón) que al poner la top coat se iba a arrastrar el esmalte rojo (y fue exactamente lo que paso) asi que disfruten las fotos y compartan sus opiniones!


*Remember you can always ask for a tutorial, ill be happy to do it
*Si me lo piden, puedo hacer un tutorial con mucho gusto

Swatch & review - Nicole by OPI: Follow me on glitter

Hello everyone! 
Today I have a swatch/review of this beauty for you: Nicole by OPI's Follow me on glitter. This was a part of the Kardashian Kolors Holiday Collection 2011; that's a year ago. This is an oldie but goodie. 
Follow me on glitter is a grey base fully packed with silver micro glitter and small multi-color round glitter. Full opacity can be achieved in two coats. Application is quite easy for being so full with glitter. It does dry a little bumpy but nothing that cant be fixed with a top coat. Its a stunning, almost metallic color. The multicolor glitter makes it unique. I dont have anything like it on my stash. But let's see some pics:

Hola a todos!
Hoy les tengo un swatch / review de esta belleza: Follow me on glitter de Nicole by OPI. Este fue parte de la colección de navidad Kardashian Kolors del 2011; osea hace un año. Es 'viejito' pero es muy, muy bonito.
Follow me on glitter es una base gris cargadísima de micro glitter plateado con pequeños glitters redondos multicolor. Opaco en 2 capas. La aplicación es bastante sencilla para estar lleno de glitter. Al secar, la superficie queda ligeramente irregular, nada que una top coat no arregle. Es un tono bellísimo, casi metálico. El glitter multicolor lo hace único. No tengo nada semejante en mi colección. Pero veamos algunas fotos:


Whats your opinion on this? Do you have Follow me on glitter? 
Thank you for reading!

¿Que opinas? A mi me encanta. 
Si vives en México y te interesa conseguir este tono, la colección volvió a llegar a Beauty Corner (información del lado derecho del blog -->) hace unas semanas. Y tienen piezas de colecciones pasadas y vigentes (Skyfall by OPI!)


Related Posts Plugin for WordPress, Blogger...