Mostrando las entradas con la etiqueta do it yourself. Mostrar todas las entradas

viernes, 2 de agosto de 2013

Recent vids / Videos recientes

Hi everyone! How are you? I'm fine :D i'm struggling with some health issues but luckily nothing major. So, as many of you know, I have a youtube channel, and I usually link to the vids on posts BUT there are many vids that I havent talk about in here. So I'll put the video and a picture of the designs and maybe a word or two about it. Its going to be a quick post since i'm preparing a H U G E post on Shimmer Polish, which you all know that I'm in love with.
NOTE: All my vids are in spanish because, well, i'm mexican. Nonetheless you can still watch them, the designs I've done are not complicated at all and just by seeing what I do you'll get the hang of it. 

Hola, todos! Como están? Yo muy bien :D Con algunos problemillas de salud pero por suerte nada grave. Bueno, como muchos de ustedes saben, tengo un canal de youtube, y normalmente pongo links a los videos en los post PERO hay muchos videos de los cuales no he hablado aquí. Así que pondre el video y una foto de los diseños y quizás una palabra o dos acerca del mismo. Va a ser un post rápido ya que estoy preparando uno E N O R M E de shimmer polish, que ya todos saben que estoy enamorada de la marca.

Chevron /zigzag nails


I looove chevrons! But if you've ever tried to do them on your nails you'll know they are seriously the hardest! it would seem its almost impossible to draw them by hand. Most people use tape, but i'm really unpatient and I just cant wait til polish its dry enough to apply the tape. I did this vid for people like me who just cant get a tape manicure right.

Aamo los zizag en mis uñas! Pero si alguna ves han intentado pintarlos a mano sabrán que, de verdad, es imposible! Pareciera que asi lo es cuando intenté pintarlos a mano. Mucha gente usa cinta adhesiva, peeeero soy muy impaciente y simplemente no puedo esperar a que el esmalte este lo suficientemente seco como para poner la cinta. Hice este video para la gente como yo que de verdad no podemos hacer un mani con cinta. No, no, no.


Quick tip: Glitter


Before that, I came up with a quick vid on how to make your glitter creamy polish to stand out more. I plan to do a 'Quick tip' series on the future.

Antes de eso, se me ocurrió hacer un video rápido sobre como hacer que el esmalte de glitter (con base creamy) luciera mucho mas. Planeo hacer una serie de 'Quick tip's en el futuro.


Review + 2 tuts.


One of the recent vids on my youtube is also one of the most requested ones. Not all by itself but the part where I show how to do roses! I actually have a video for roses and I've placed it on some blog posts before, but this one is slightly different cause its actually the tutorial for the roses I do all the time and everyone seem to like, where I use pink, green and white only and starting from that I create 4 more shades to give depth to the roses.

Uno de mis videos mas recientes es también uno de los más solicitados. No todo en sí pero sí la parte donde enseño como hacer rosas! De hecho yo ya tenía un video sobre como hacer rosas y lo he insertado en algunos blog posts antes, pero este es ligeramente diferente ya que es de hecho el tutorial para las rosas que hago todo el tiempo y que parece ser que a todo mundo le gustan, donde uso rosa, blanco y verde solamente y a partir de ahí, creo otros 4 tonos para dar profundidad a las rosas.


 I talked about this on the vid / Hablé de este diseño en el video
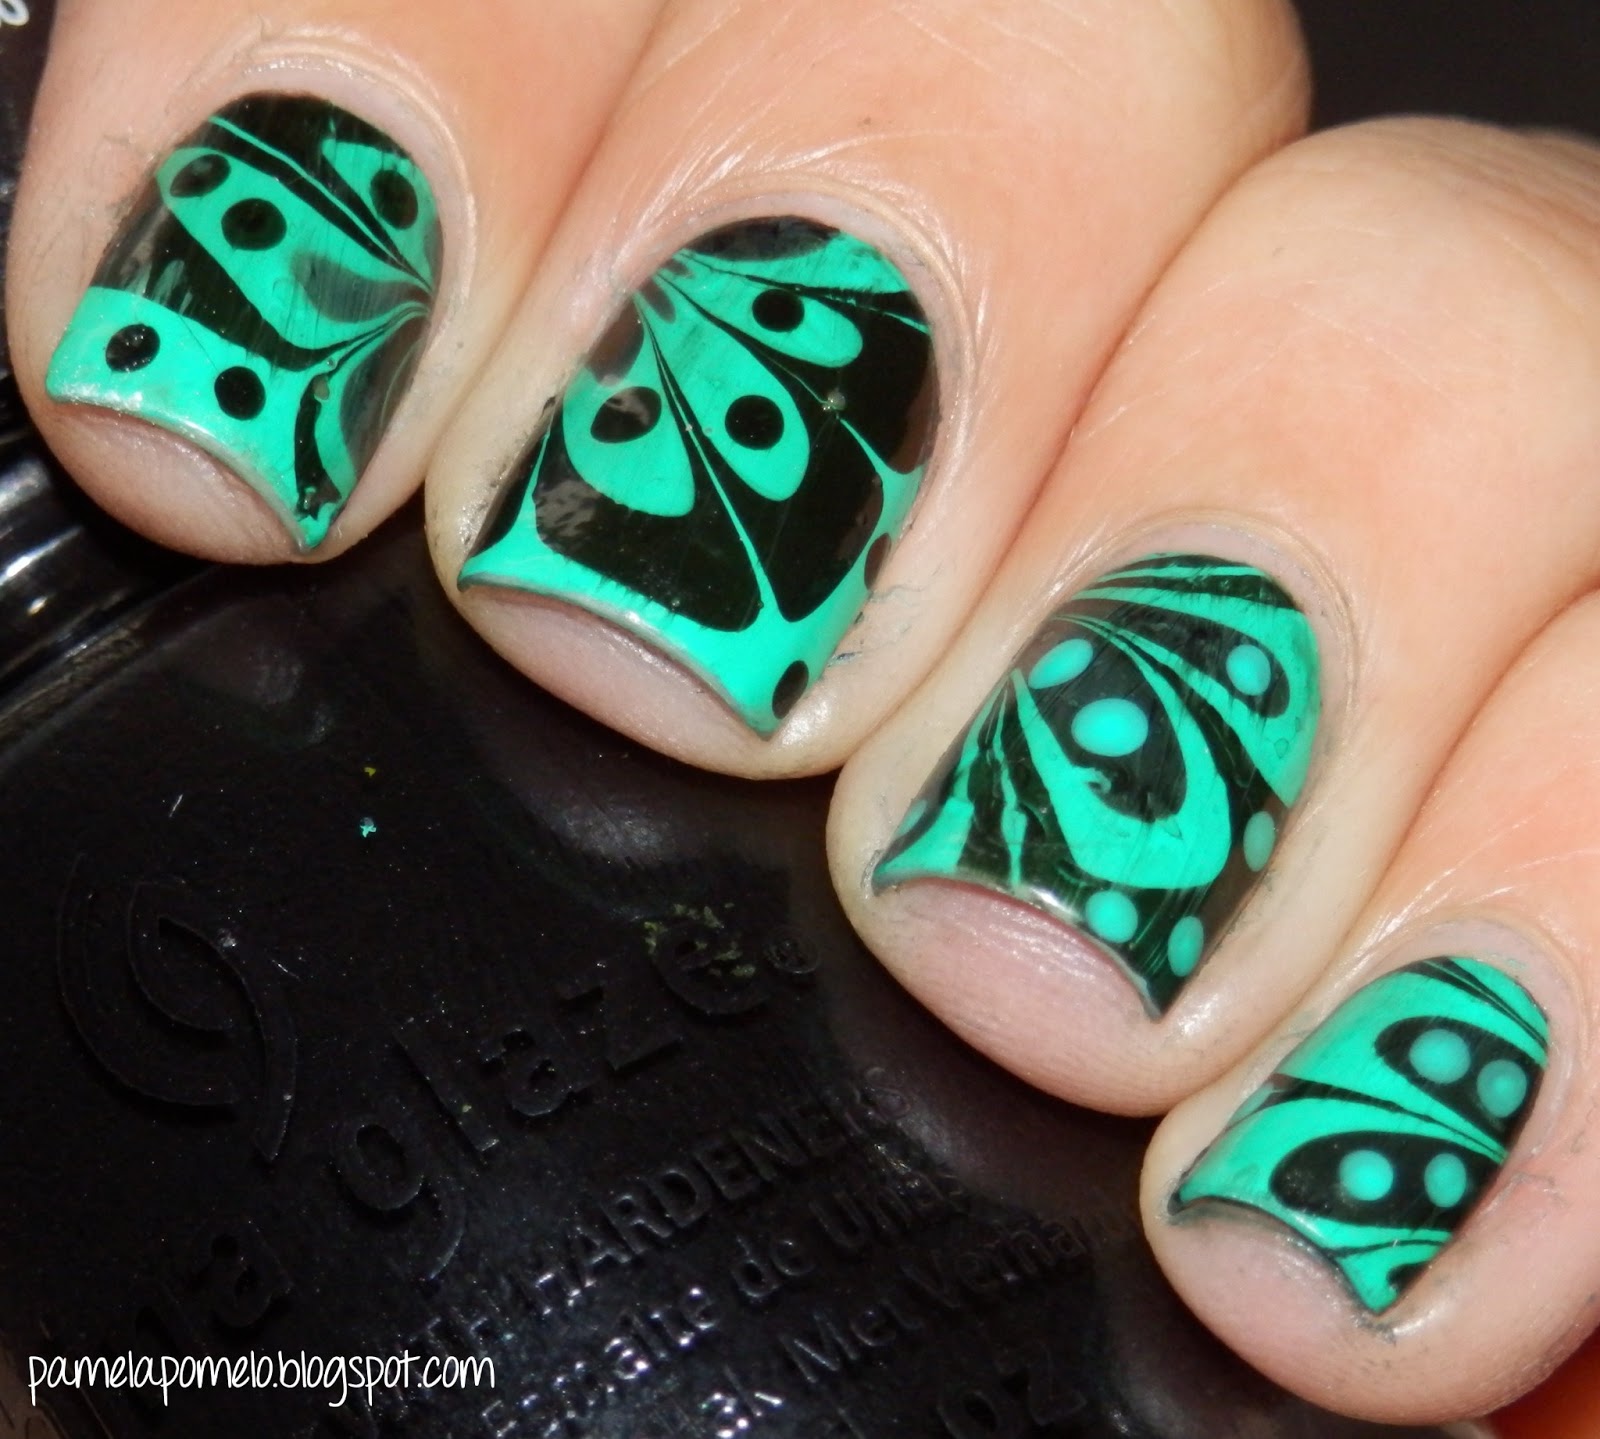

Watermarble 


Finally, and just because I cant remember if I had linked to this before, here's a watermarble tutorial using my fave indie glow in the dark nail polish line: PolishMeToGo. Is super easy and trust me when I say that cause I suck at watermarbles. 

Finalmente, y solo porque no puedo recordar si ya había mostrado esto antes, aqui un tutorial de watermarble usango mi linea de esmaltes glow in the dark favorita: PolishMeToGo. Es super fácil y creanme cuando les digo eso porque apesto haciendo watermarbles.


Anyway, I hope you enjoyed this post and I'll be back very soon with all the new swatches of Shimmer Polish. If you like the vids you can subscribe to 'thenailsensation'. You can also follow me in Instagram (@pamelapomelo), twitter (@thenailsensblog) or facebook (the nail sensation). Thank you for visiting and reading!!

Bueno, espero que les haya gustado este post y estaré de vuelta muuuy pronto con todos los swatches de Shimmer Polish. Si les gustaron los videos, suscribanse a 'thenailsensation'. También me pueden seguir en Instagram (@pamelapomelo), twitter (@thenailsensblog) o facebook (the nail sensation). Gracias por visitar y leer!!

domingo, 28 de abril de 2013

Nuevos videos!

Hola!
Esta entrada es super sencillita solo para mostrárles los nuevos videos en mi cuenta de youtube, espero que les gusten, y les sirvan! Dejenme todos sus comentarios y sugerencias!

El primero es un otro tutorial para hacer unas flores muy lindas:


El segundo, es sobre una técnica conocida como Water Spotted con la cual se pueden conseguir resultados muy variados.


Besos, y gracias por ver!


lunes, 25 de marzo de 2013

Floral nails + tutorial! / Diseños florales + tutorial!

 Hi everyone! Today's post is all about flowers, yey!
First, we'll see two designs, and to end the post there's a video tutorial (spanish audio, sorry:( ) Keep scrolling down if you wanna check it out.
The first design is very detailed, it took me a while to do it and I really liked the result, I think its classy and cute.

Hola a todos! El post de hoy es todo de flores! yey!
Primero, veremos dos diseños, y para terminar el post hay un video tutorial! Asi que sigue bajando si quieres verlo!
El primer diseño es muy detallado, me tomo un rato hacerlo y realmente me gustó el resultado, creo que es algo con clase y lindo.


Now, the second design, I fell in love with it! This one is more fierce and the color combo is quite interesting. The flowers are completely different from the first design. 
Annnddd.. we have a tutorial for this design! Keep going down, you're almost there!

Ahora, el segundo diseño, lo amé! Este es más 'feroz' y la combinación de colores es bastante interesante. Las flores son completamente diferentes al primer diseño. 
Yyyyyyy... tenemos un tutorial para este diseño! Sigue bajando, ya casi llegas!


Here's the tutorial, im sorry but as I am mexican i've been doing my tutorials in spanish, hopefully i'll add subtitles or something very, very soon. You can still watch it and just see what im doing! Thank you so much for reading, a big kiss!!

Aqui está el tutorial! Espero que les guste, cuentenme que les parece y que quieren ver para el siguiente video! Gracias por leer besos!


miércoles, 6 de marzo de 2013

Tutorial: Quilted nails


 Hi everyone! Im sorry that I've been quite absent lately is just school is taking all of me haha! 
Today I have a small tutorial for you guys. I know there must be a lot out there to recreate this nail style (a.k.a. Quilted naisl) but sometimes as I have stated before I just like to do my own in case someone likes mine better.
Lets get crafty!

Hola a todos! Perdón por estar tan ausente ultimamente, es la escuela que esta tomando todo de mi jaja! Hoy les traigo un pequeño tutorial. Se que debe haber varios en otros websites para recrear este mani (se le conoce como quilted nails)  pero a veces, como he dicho antes, me gusta hacer mis propios tutoriales en caso de que alguien los encuentre mas útiles.
Manos a la obra!


 You need: / Necesitas:

-Nail polish (you can use any color but I think it looks cute on white-based tones)/ Un color de esmalte (puede ser el color que quieras pero a mi me gusta mas con tonos blancos/nude)
-Matte top coat / Esmalte matificador
-Microbeads (also known as caviar) / Microperlas también conocidas como 'caviar'
-thread (floss can also be used) / hilo (también puedes usar hilo dental)
-Dotting tool / Puntero 


Paint your nails with the color you want. Apply matte top coat.
Pinta tus uñas con el color que elegiste. Aplica esmalte matificador.


Now, while the surface is dry but the layers are wet, cut a piece of thread and gently press as indicated in the images. We want to do it like a diamond pattern.

Ahora, mientras la superficie esta seca pero las capas estan frescas, corta un trozo de hilo y presiona suavemente como se indica en las imagenes. Queremos hacer rombitos.


Once you're done you can make the lines as intense as you want with the help of the thin side of the dotting tool. This is optional and its only in case you're not satisfied with the efect you got by using floss. Remember to press gently.

Ya que acabes de usar el hilo puedes hacer las lineas tan intensas como tu quieras con la ayuda de la parte delgada del puntero. Esto es opcional y solo es en caso de que no estes satisfecha con el efecto que obtuviste al usar el hilo. Recuerda presionar suavemente.


Place a drop of matte top coat over a piece of paper and get some of the microbeads out. With the dotting tool, place a small drop of matte top coat on one of the intersections of the lines you did before. Then grab one of the microbeads using the dotting tool and place it over the drop.

Pon una gota del esmalte matificador en un trozo de papel y vacía unas cuantas perlas para tenerlas a la mano. Con la ayuda del puntero, coloca una gotita en una interseccion de las lineas que hiciste. Luego toma una perlita con ayuda del puntero y colocala sobre la gotita.


Repeat until you cover every intersection and you're done!

Repite hasta que cubras cada intersección y ya acabaste!


And as always, here's the condensed version of the tutorial.
Y como siempre, aqui esta la versión condensada del tutorial.


The final result is very, very pretty. This is not a long lasting mani (I got to wear it about a day) but I must say it's worth it! Give it a try! I leave you now with more pics. If you recreate this nail style please, share it with me! I'd love to see. You can share it with me on twitter, facebook, instagram or email me at thenailsensation@hotmail.com. Hope you find this useful. Thank you for reading!

El resultado final es muy muy bonito! Este mani no dura mucho (yo lo usé un día entero) pero debo decir que vale la pena! Intentenlo! Los dejo con mas fotos. Si recrean este diseño por favor, compartanlo conmigo! Me encantaría ver. Pueden compartirlo en twitter, facebook, instagram o enviarme un correo a thenailsensation@hotmail.com. Espero que encuentren esto útil. Gracias por leer!


martes, 29 de enero de 2013

Water spotted / Spotted con agua

 Hi everyone! A few days ago I did a nail design that many people liked so I made a little tutorial.
Im sure there's a ton out there but sometimes I like to make my own in case someone understands it better. This design is called 'water spotted'. It is called like that because a few months ago, OPI released the Spiderman collection with a special effect polish, only available in France (and Norway?). All the other countries received a shatter polish instead. I think it was because of some ingredient that is not allowed everywhere or something. Check pics of OPI 'Black Spotted'. 
It was on ebay but it was mad expensive so this is a cheap, easy, and way much better way to recreate the effect of Black Spotted. 
Note: Easier than watermarble!

Hola a todos! Hace algunos dias hice un diseñito que a muchos les gustó, asi que hice un tutorial. Estoy segura de que hay muchos pero a veces me gusta hacer los mios por si alguien los entiende mejor. Este diseño se llama 'water spotted'. Se llama asi porque hace unos meses, OPI lanzó la colección de Spiderman con un esmalte de efecto especial, solo disponible en Francia (y en Noruega?). Los demás paises recibieron un craquelado en lugar de ese. Creo que fue porque tenía un ingrediente que no está permitido en todos lados o algo asi. Mira fotos de OPI 'Black Spotted'.
Estaba en ebay pero estaba espantosamente caro asi que esta es una forma barata, fácil y mucho mejor para recrear el efecto de Black Spotted. 
Nota: Más fácil que el watermarble! 

You need:
-2+ different colors of nail polish 
-Hairspray. Or Hand sanitizer. Pretty much something that contains alcohol. 
I only tried with hairspray so I dont know how other products work.
I got mine from Sallys.
-A tiny glass -like a shot glass- with water (enough to dip your nail)
I always recommend to use small containers so you won't waste much polish. Size comparison on the third pic.

Necesitarás:
-2+ colores diferentes de esmalte
-Spray para el cabello. O sanitizante de manos. Algo que tenga alcohol y que pueda rociarse. 
Yo compre el mio en Sally. 
-Un vasito pequeño (como un vasito de shot) con suficiente agua para sumergir toda tu uña
Siempre recomiendo usar un contenedor pequeño para desperdiciar poco esmalte. En la tercera foto hay una comparación de tamaños.


Paint your nail with the base color

Pinta tu uña con el color base 


Pour nail polish on the surface of water. Just one drop will do the job, unless you use a really sheer polish. Either way add more if you think its necessary.

Pon una gota de esmalte en la superficie. Solo una gota bastará, a menos de que uses un esmalte muy traslucido. De cualquier forma puedes añadir mas si crees que lo necesita.


Next, spray your desired product. Make it quick, we dont want dry polish. Point it to the glass. Different ways to spray give different results. You can do it closer, farther, just a quick touch or a bigger one. The closer you apply, the bigger the spots you get. I kinda liked bigger spots. 

Luego, rocía el producto que elijas. Hazlo rápido, no queremos que el esmalte se seque. Apunta al vaso. Diferentes formas de rociar dan diferentes resultados. Lo puedes hacer cerca, lejos, solo un toque rapido o uno mas largo. Si aplicas mas cerca, obtienes puntos (hoyos?) mas grandes. A mi me gustaron los grandes. 


Then just dip your finger wherever you want.

Después sumergue tu uña en donde más te guste.

Remove the dry polish of the water surface using a toothpick. Then take out your finger. Clean up with the help of a makeup brush and acetone or a q-tip. Apply a top coat.

Quita el esmalte seco de la superficie del agua con ayuda de un palillo. Luego saca tu dedo.
Limpia los bordes y la piel con una brocha y acetona o un q-tip. Pon tu top coat favorito.


DONE! LISTO!


 But of course.. Something was missing! Dip again for a new look! I suggest bigger spots for double dipping.

Pero claro, algo faltaba. Repite los pasos con otro color para un nuevo look! Sugiero spots mas grandes para hacerlo dos veces.


I hope you fint this tutorial useful. If you have any doubts/suggestions/anything please comment below! Much love!

Espero que este tutorial sea útil. Cualquier duda/sugerencia/loquesea por favor comentar!!! Besos!


sábado, 8 de diciembre de 2012

Watermarble: tips & tricks

Hi everyone! Today i'll tell you about my personal experience with watermarble so lets get started!
Hola! Hoy les contaré mi experiencia personal con el watermarble asi que empecemos!

So.. Watermarble. If you dont know whats a watermarble, I suggest you watch this video from my friend The Crafty Ninja on youtube. 
The watermarble technique is horrible! For so long I hated it (and I still do sometimes). Some of the issues I had were:
-Its a super mess / clean up its too hard
-My polish won't spread nicely
-When I try to make my design it gets ruined
-First polish spread nicely but second drop just doesnt
-My cuticles get too stained
Among other issues. It is really a hard technique to master. I've been doing nail art for several months now and the first thing I tried to do back then was watermarble. Theres no need to say I failed horribly. And it was only two weeks ago that I did a watermarble that I could call 'acceptable'. But let's take a look at the pics:

Watermarble : /. Si no sabes que es watermarble te sugiero que veas este video de mi amiga The Crafty Ninja en youtube.
La técnica del watermarble es horrible! Por mucho tiempo la odié (y a veces aun la odio). Algunos problemas que tuve fueron:
-Es un lío enorme / limpiar es muy difícil
-Mi esmalte no se expande bien
-Cuando intento hacer un diseño se arruina
-El primer esmalte se expande bien pero el segundo simplemente no
-Mis cutículas se manchan
Entre muchos otros problemas. Es realmente una técnica difícil de dominar. He estado haciendo nail art desde hace varios meses y lo primero que intente en esa entonces fue el watermarble. No hace falta de decir que fallé horriblemente. Y fue hace solo 2 semanas que hice un watermarble que pude llamar 'aceptable'. Pero veamos las fotos:


As you can see I had some problems. First of all my cuticles are super dirty, clean up was hard as hell. There's a lot of nail polish in my skin as you can see on my middle finger, but also I took of a lot of polish from my ring finger. The other ones are acceptable but not perfect. 
Theres a lot of dragging of the colors and they are mixed at some spots. Also I wasn't able to do a proper design and it looks too random. 

Como puedes ver tuve algunos problemas. Primero que nada mis cuticulas estan super sucias, limpiarlas fue muy dificil. Hay mucho esmalte en mi piel en mi dedo medio, pero tambien tomé demasiado esmalte cuando limpié mi dedo anular. Los otros estan aceptables, pero no perfectos.
Arrastré mucho los colores y estan mezclados en algunos puntos. Tampoco pude hacer un diseño tal cual y se ve muy random.

Now let's take a look at my second acceptable attempt.

Ahora veamos my segundo intento aceptable.


 I improved the clean up withouth taking a lot of polish off. Buuut.. There's a lot of dragging, i mean seriously can you see those horrible lines? disgusting! I got better when making the design though. Then I added a few dots with a dotting tool just because.

Mejoré en la limpieza sin quitar demasiado esmalte. Peeeero.. arrastré mucho los colores, puedes ver esas horribles lineas! Horrible! Sí mejore un poco en cuanto al diseño. Añadí algunos puntos con un puntero solo porque sí.

Here comes my third and most succesful attempt.
Ahora mi tercer y mas exitoso intento.


What do you think? I think clean up is perfect. Absolutely no dragging, nor mixing.  The design is exactly what I wanted, something simple, just some lines. It had a top coat before but I thought it would look awesome matte and so I did with Essie- matte about you.

Que te parece? Creo que la limpieza es perfecta. No hay arrastre de los colores, ni mezclado. El diseño es exactamente lo que queria, algo simple, solo algunas lineas. Tenia una top coat antes pero pensé que se vería genial mate y asi lo hice con Essie -  matte about you.

Now I do have some advice for you if you want to try watermarble:
-If its your first time with this technique, be patient. It's not going to come out nicely at first try. This is something you must try over and over again.
-Make some nail polish proofs. Did you noticed I used the same green on 2nd and 3rd attempts? Its China Glaze - Four leaf clover. When I poured it to the water it spread amazingly well. Thats what you should look for. Which ones of your stash can be used in watermarble. Cause some of them just stay in the drop and thats it, and thats not going to work at all.
-Be quick. If you take a lot of time between dropping one color and the other one, the polish will dry and when you try to make your design, it will break. Or when you pour the other color, it wont spread.
-Use a small container. When you do watermarble its convenient to do one nail at the time. If you use a big container you will waste a lot of nail polish. Also the design might get too big and wont fit your nail bead.
-Don't use polishes that are too pigmented. That's because it will make harder to clean your skin. Not impossible, just harder.
-Let the design dry before you apply a top coat to avoid dragging. 
-The most important thing is not to be dissapointed. Everyone can make a watermarble. It took me several months to achieve what you saw on the pics and I still need to master it. Remember practice makes perfect.

Ahora tengo algunos consejos si quieres intentar watermarble:
-Si es tu primera vez con esta técnica, se paciente. No va a salir perfecto en el primer intento. Esto es algo que tendrás que intentar una, y otra, y otra vez. 
-Haz algunas pruebas de esmalte. Notaste que use el mismo verde para el primer y segundo intentos? El color es Four Leaf Clover de China Glaze. Cuando lo puse en el agua se abrio increíblemente bien. Eso es lo que estas buscando. Cuales esmaltes tienes que se puedan usar, porque algunos de ellos simplemente se quedaran como una gota y ya, y eso no va a funcionar para nada. 
-Trabaja con rapidez. Si tomas mucho tiempo entre poner un esmalte y otro, el esmalte se secará y cuando intentes hacer el diseño, la superficie se romperá, o cuando pongas el otro color, este no se extenderá. 
-Usa un contenedor pequeño. Cuando haces watermarbles es conveniente hacer una uña a la vez. Si usas un contenedor grande, se desperdiciará demasiado esmalte. También puede suceder que el diseño quede demasiado grande y no cabrá en tu uña.
-No uses esmaltes que esten muy pigmentados. Eso es porque hará mas difícil limpiar tu piel. No imposible, solo mas difícil.
-Deja que el diseño se seque antes de poner la top coat para evitar el arrastre de esmalte.
-Lo mas importante es no decepcionarse. Cualquiera puede hacer un watermarble. A mi me tomo varios meses hacer lo que viste en las fotos y todavía necesito perfeccionarlo. Recuerda que la práctica hace al maestro. 

So thats my experience/advice and I hope you find it useful. Thank you for reading!

Bueno, esa fue mi experiencia/ consejo y espero que la encuentres útil. Gracias por leer!

Pamela.

Related Posts Plugin for WordPress, Blogger...